Step 1.
- Download and install mIRC
Step 2.
- Launch the program
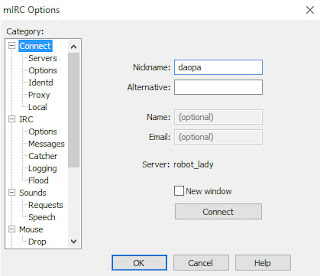
- Click on Tools, then Options
- On the side menu click on Connect
- Enter your twitch username in lowercase for Nickname

Step 3.
- In mIRC Options, click servers
- Delete all the folders, entries that are listed by default
- Once the IRC Server list is clear, click ADD
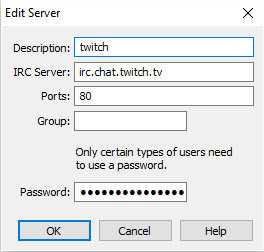
- For Description enter: Twitch
- For IRC Server enter: irc.chat.twitch.tv
- For Ports enter: 80
- Leave Group blank
- For Password you need OAuth Token, use TwitchApp to generate it or the Twitch API
- Press OK

Step 4.
- In mIRC Options, click Connect
- Under that is Options, click on that
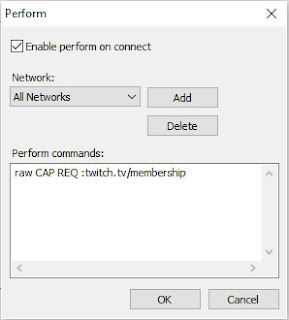
- Then click on Perform Button
- Check the box that says Enable perform on connect
- Add in the following inside the text box: raw CAP REQ :twitch.tv/membership
- Then press OK, then again OK to leave Options window.

Step 5.
- Click on Favorites in the menu bar
- Then go to Organize Favorites
- If this has a list of favorites already populated, delete all of them
- Once you clear the list, press Add
- Enter the channel you wish to connect, for example I want to join my channels irc, so I will enter #daopa in the channel text box, then press option to Join on connect.
- Add whatever channels you use to join, with option to auto connect if you prefer it to join like that.
Additional Server Settings (if above settings do not work)
- Server: irc.chat.twitch.tv
Ports: 80, 6667
SSL ports: 443, 6697 - Server: irc-ws.chat.twitch.tv
Port: 80
SSL port: 443
super ! merci!
ReplyDelete